Insulation removal may not be at the top of your to-do list, but it’s an important step in maintaining your property’s comfort, safety, and energy efficiency.
Old insulation can become a cozy home for pests that harm your health and lead to moisture damage. Removing damaged insulation helps prevent odors and improve indoor air quality. Click here to Learn More.
Insulation is a great way to keep your home comfortable and reduce energy costs. However, over time, insulation can become damaged and lose its effectiveness. This may be due to rodent infestation, water damage or mold growth which can impact your home’s indoor air quality and health.
When this happens, it’s important to identify the issue as soon as possible and take action to remove and replace the old insulation. Hiring insulation removal professionals will ensure the process is completed safely and in compliance with local environmental regulations. They will also have the proper equipment to handle various types of insulation materials and can recommend the best replacement option for your home.
Different types of insulation require different removal methods, which is why it’s vital to understand the issues that can arise and how to resolve them. For example, spray foam insulation needs a different set of tools and safety measures than fiberglass insulation as it contains adhesives that can cause skin irritation if handled improperly.
Moisture is another common reason why homeowners opt for insulation removal. It can cause a number of issues, including promoting mold and mildew growth that can lead to respiratory problems in humans and damage the structure of your home’s attic. It can also contribute to poor indoor air quality and uncomfortable temperatures.
When deciding which insulation removal company to hire, it’s important to check their reputation and customer reviews. You should also ask for references from previous clients and see if they have experience handling similar projects. This can help you determine if the company is qualified to tackle your project.
In addition to being a potential health hazard, damaged insulation can create costly air leaks that can result in higher energy bills. It can also compromise the structural integrity of the attic and increase your risk of damage during future renovations.
When it comes to replacing your insulation, professional installation is the key to ensuring optimal performance and energy savings. An experienced insulation team will have the knowledge and tools to effectively and safely remove old insulation from your attic or crawl space while ensuring that your new insulation meets the recommended level of efficiency.
Preparing the Area
When working with older insulation, the first step in removal is often securing the area to prevent dust and debris from contaminating the rest of the house. This means putting up plastic sheeting and sealing off the space with adhesive zipper doors. It is also a good idea to set up fans and open windows to provide ventilation while working in the attic.
Once the insulation is removed, it is important to take stock of the space and check for any damage or rot that may have occurred over time. A professional inspection can reveal hidden problems such as mold or rodent droppings that should be addressed before adding new insulation. The attic should also be thoroughly inspected for water damage, as moisture can seep into joists and cause structural issues.
If the existing insulation is not salvageable, or if there are concerns about water leakage, it may be necessary to remove all of it. This can be a more involved project, requiring the teardown of drywall to get to the insulation. This option is typically best handled by professionals who can also handle the disposal of the old insulation.
The preferred method for removing blown-in insulation is to use a vacuum system. A gas-powered unit can be rented from many home improvement stores and will usually come with a long hose that can reach from the attic to the machine for easy removal. This is the quickest and most efficient way to remove insulation, and it can also help minimize airborne contaminants.
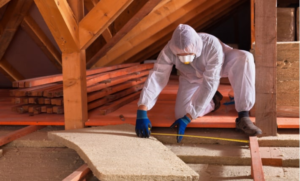
Regardless of the removal method, it is a good idea to wear safety gear, including gloves, a mask, and eye protection. Insulation can contain irritants such as fiberglass particles, so it is important to minimize contact.
Whenever possible, it is also important to recycle or dispose of the insulation properly. Some areas have specific regulations on the types of waste that can be disposed of, and it is wise to contact local waste management to learn about these guidelines. Insulation can be placed in heavy-duty bags, sealed tightly, and labeled as hazardous material if needed. It can then be taken to a designated recycling facility for proper disposal.
Safety Measures
The health and safety of those handling insulation removal is a top priority. Proper Personal Protective Equipment (PPE), ventilation systems and the proper disposal of insulation materials minimize exposure to contaminants, thereby protecting people’s health and the environment.
Insulation removal professionals are trained to identify hazardous materials and follow strict safety protocols for their own and your health. They also have the right tools and equipment for quick and thorough insulation removal. The result is a safer and healthier home with more consistent temperatures and improved indoor air quality.
Many of the same safety precautions are necessary when removing blown-in insulation, including preparing the area, using a powerful vacuum and taking appropriate PPE. However, when working in tight spaces, at heights or with dangerous materials, the risk for injuries is increased. The right equipment, including sturdy ladders or scaffolding, ensures the work is done safely.
A reputable insulation removal company will also ensure that electrical wires are not touched or damaged during the process. This prevents the potential for short circuits or other damage that could pose a fire risk.
Blown-in insulation is made of various materials, including fiberglass, cellulose and rock or slag wool. Each has its own set of advantages and disadvantages, but they all offer excellent fire and soundproofing properties. However, the effectiveness of insulation is reduced over time as it degrades due to water or mold exposure, and rodents can nestle in it, necessitating its removal.
The most common type of insulating material for homes is fiberglass. It is inexpensive and provides good energy efficiency. However, it can be a respiratory irritant and may cause skin problems. It is also possible for it to contain asbestos, which poses a serious health risk and must be handled properly when removing old insulation.
Other types of insulating materials that are a better option include cellulose, which is made from recycled paper and is highly flame retardant, and mineral wool, which offers excellent fire and soundproofing properties. However, these materials are more expensive than fiberglass and should be used only where needed.
Getting Started
Despite being one of the smallest rooms in the home, an attic is often overlooked when it comes to DIY maintenance. This is because the space does not get much human traffic, but if you do decide to start working there, you will need to have the right tools and equipment. For a DIY insulation removal project, you will need a ladder, a commercial vacuum cleaner, heavy-duty waste bags, a rake and dustpan, and protective gear.
Before you begin removing the old insulation, you should clear any furniture or boxes from the attic space and make sure that the path from the attic entrance to the door is cleared. This will prevent any accidental damage and prevent contaminants from contaminating items that you may want to keep. Additionally, you should wear a mask when working with insulation as it can be contaminated with harmful materials and pose health risks if inhaled.
You can also prepare the attic space by sealing off any openings and ensuring that airflow is not blocked. This will prevent moisture from seeping into your walls, ceilings and floors, which can lead to rot, mold or other structural problems. You can also use this opportunity to inspect your attic for signs of water damage and pest infestations, which could necessitate a full-scale remodeling and drywall replacement.
Once you have your equipment ready and the protective gear on, you can proceed with the blown-in insulation removal process. During this time, you will need to rake and dustpan any loose insulation and transfer it into the waste bags. Once the bag is filled, you can seal it and dispose of it at a local waste management facility.
While this is a fairly simple process, it can be a challenging task for inexperienced homeowners. If you are unsure about your ability to safely remove blown-in insulation, it is recommended that you hire a professional. Professionals will ensure that the removal process is carried out in accordance with all regulations, resulting in a safe and efficient project.
A professional insulation removal service will also be able to recycle and dispose of the removed material according to strict guidelines. This will not only protect the environment but will also help you save money on energy bills.